Two key aspects of working in Azure that are often overlooked are carefully managing role assignments for users and resources and ensuring the consistent and repeatable deployment of those role assignments.
Why Role Assignments Matter
Role-Based Access Control (RBAC) in Azure must be an integral part of your cloud architecture. While a lot of thought goes into resource planning, networking, and security, I often see applications granted overly broad permissions like “Contributor” at the subscription level. This can introduce unnecessary risk. The goal is to grant the least amount of privilege required to get a task done.
The Importance of Consistency in Deployments
Consistent, repeatable deployments simplify life in the long term. I have lost count of how often “small” changes sneak into a system and are quickly forgotten. Then, on production release day, that “small” change can bring everything to a halt. With the increasing use of Managed Service Identity (MSI) access, these issues often boil down to missing role assignments that have been added last minute. If these are automated, it’s one less thing to keep track of.
How to Manage Role Assignments in Infrastructure as Code (IaC)
Role assignments in Azure can be treated like any other resource. One approach is to use Bicep to manage role assignments directly within your deployment scripts. This ensures both infrastructure and management are consistently deployed.
Here’s an example a Bicep Module that can be used to assign roles when deploying an Azure resource, such as a Logic App, that requires access to Service Bus:
@description('The full name of the Service Bus instance to grant the role on')
param serviceBusName string
@description('The principal Id of the resource that will be assigned the Service Bus role')
param principalId string
@description('The name of the Service Bus role to grant')
@allowed([
  'Azure Service Bus Data Receiver'
  'Azure Service Bus Data Sender'
])
param roleDefinition string

var roles = {
  // See https://docs.microsoft.com/en-us/azure/role-based-access-control/built-in-roles for these mappings and more.
  'Azure Service Bus Data Receiver': '/providers/Microsoft.Authorization/roleDefinitions/4f6d3b9b-027b-4f4c-9142-0e5a2a2247e0'
  'Azure Service Bus Data Sender': '/providers/Microsoft.Authorization/roleDefinitions/69a216fc-b8fb-44d8-bc22-1f3c2cd27a39'
}

var roleDefinitionId = roles[roleDefinition]

resource serviceBus 'Microsoft.ServiceBus/namespaces@2022-01-01-preview' existing = {
  name: serviceBusName
}

// Requires at least version 2018-01-01-preview!
resource roleAuthorization 'Microsoft.Authorization/roleAssignments@2020-10-01-preview' = {
  // Generate a unique but deterministic resource name
  name: guid('servicebus-rbac', serviceBus.id, resourceGroup().id, principalId, roleDefinitionId)
  scope: serviceBus
  properties: {
    principalId: principalId
    roleDefinitionId: roleDefinitionId
    principalType: 'ServicePrincipal'
  }
}
This module accomplishes several things:
- Human-readable roles: It maps the passed in readable role names to their fully qualified identifiers.
- Use of existing resources: It references an existing Service Bus resource.
- Service Bus role assignment: It assigns the role scoped just to the referenced Service Bus instance.
- Principal ID: It assigns a role to the passed in principalId.
- Role assignment creation: It creates the roleAssignments resource with the provided principalId and role.
Using the Module in Bicep
Here’s an example of how to use this module:
module logicAppSbRoleAssignments 'br:crintgsharedauedev.azurecr.io/bicep/modules/sbroleassignment:v1' = [for role in logicAppSbRoles: {
  name: '${logicAppName}-${replace(role, ' ', '')}-Assignment'
  scope: resourceGroup('${intgSharedResourceGroup}-${regionSuffix}-${environment}')
  params: {
    principalId: logicAppConsumption.identity.principalId
    roleDefinition: role
    serviceBusName: '${serviceBusName}'
  }
}]
Key points:
- The module keyword is used to reference the module.
- It loops over roles defined in an array parameter (e.g., “Azure Service Bus Data Receiver” and “Azure Service Bus Data Sender”).
- The principalId references the Logic App’s identity.
- The serviceBusName is also pulled from parameters.
This module can be adapted for any resource you typically assign MSI access to, such as Key Vault. The main benefit here is granular role assignments, rather than giving blanket permissions.
One thing to note is that I have the module in an Azure Container Registry, and why the reference has a link to ACR. But you can achieve the same thing with the module in your repo.
Limiting Role Assignment Permissions
Now that we’ve automated role assignments, there’s another step to consider: managing who can assign roles. This requires careful handling, as role assignments are a privileged action.
Typically, a service principal is used for automated deployments (e.g. tied to an Azure DevOps service connection). However, by default, the service principal might not have enough permissions to execute role assignments, so you’ll need to grant it additional access. This is where things can get tricky, and over-permissioning must be avoided.
What I see some organisations do is use the built-in role “Role Based Access Control Administrator”. If you go and look at this role though, it has a great deal of permissions, and frankly we just don’t need that many. We can create a “custom role” instead that is scoped much tighter in terms of what it can do.
Another interesting feature of Azure RBAC is “role assignment conditions” that can add additional guard rails around how the role assignment can be used.
With these two features, we can make things much more secure.
Creating a Custom Role
This is pretty simple but gives a bit more peace of mind when you compare it to the built-in role “Role Based Access Control Administrator” I mentioned previously. The custom role looks like this:
{
    "properties": {
        "roleName": "Role Assignment Writer",
        "description": "",
        "assignableScopes": [
            "/subscriptions/{YOUR SUBSCRIPTION ID}"
        ],
        "permissions": [
            {
                "actions": [
                    "Microsoft.Authorization/roleAssignments/write"
                ],
                "notActions": [],
                "dataActions": [],
                "notDataActions": []
            }
        ]
    }
}
This custom role is designed to only create role assignments, preventing unwanted or accidental changes that might come with using a higher-privileged role.
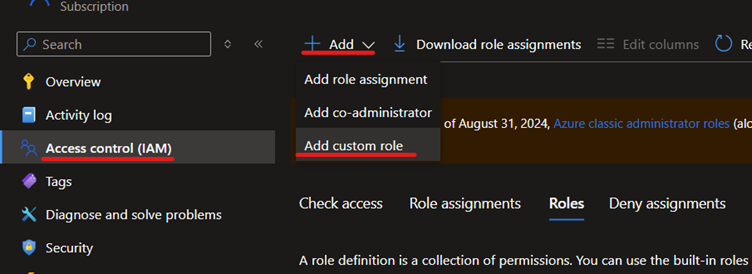
You can create this in Azure by going to IAM on any resource, hitting the Add button and selecting “Add custom role”:

Here you can either follow the wizard or go straight to the JSON tab and paste in the example.
NOTE: You will need to substitute in your own subscription ID. You may also want to narrow down the assignable scope to a resource group for example.
The Custom Role Assignment with Conditions
Now that we have the custom role, we need to grant it to our DevOps service principal so that it can start automating our role assignments to other resources.
If we were to assign this custom role directly, code executed by the DevOps service principal would still be able to grant any entity, any role, against anything else. Again, not good.
We want to reduce what roles it can assign. The wizard for role assignment of privileged roles has improved a lot recently and will actively try and steer you away from letting this role assignment go out unrestricted.
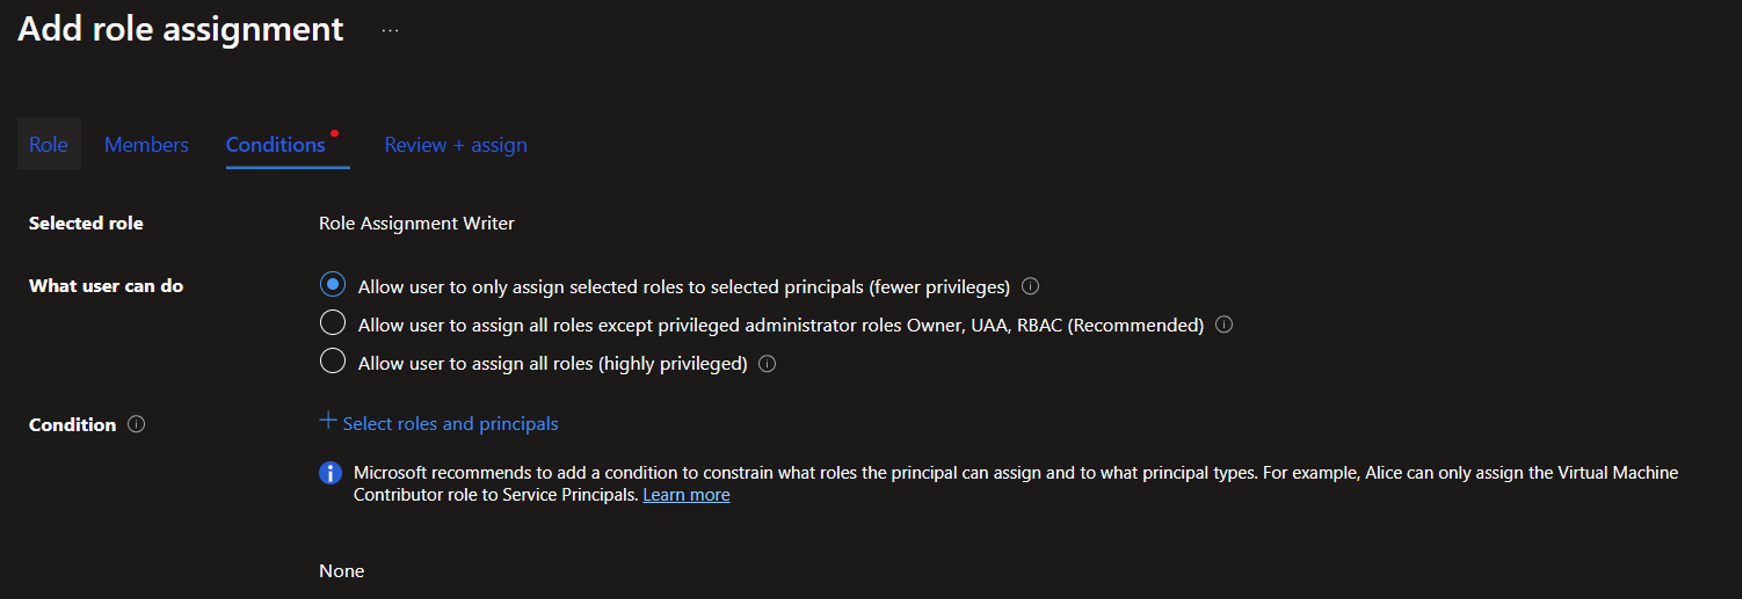
In the wizard we can do the following:
- Under Conditions we can say that while the role is applied to the member, it can only be used for specific roles:

- Click the “+ Select roles and principals”.
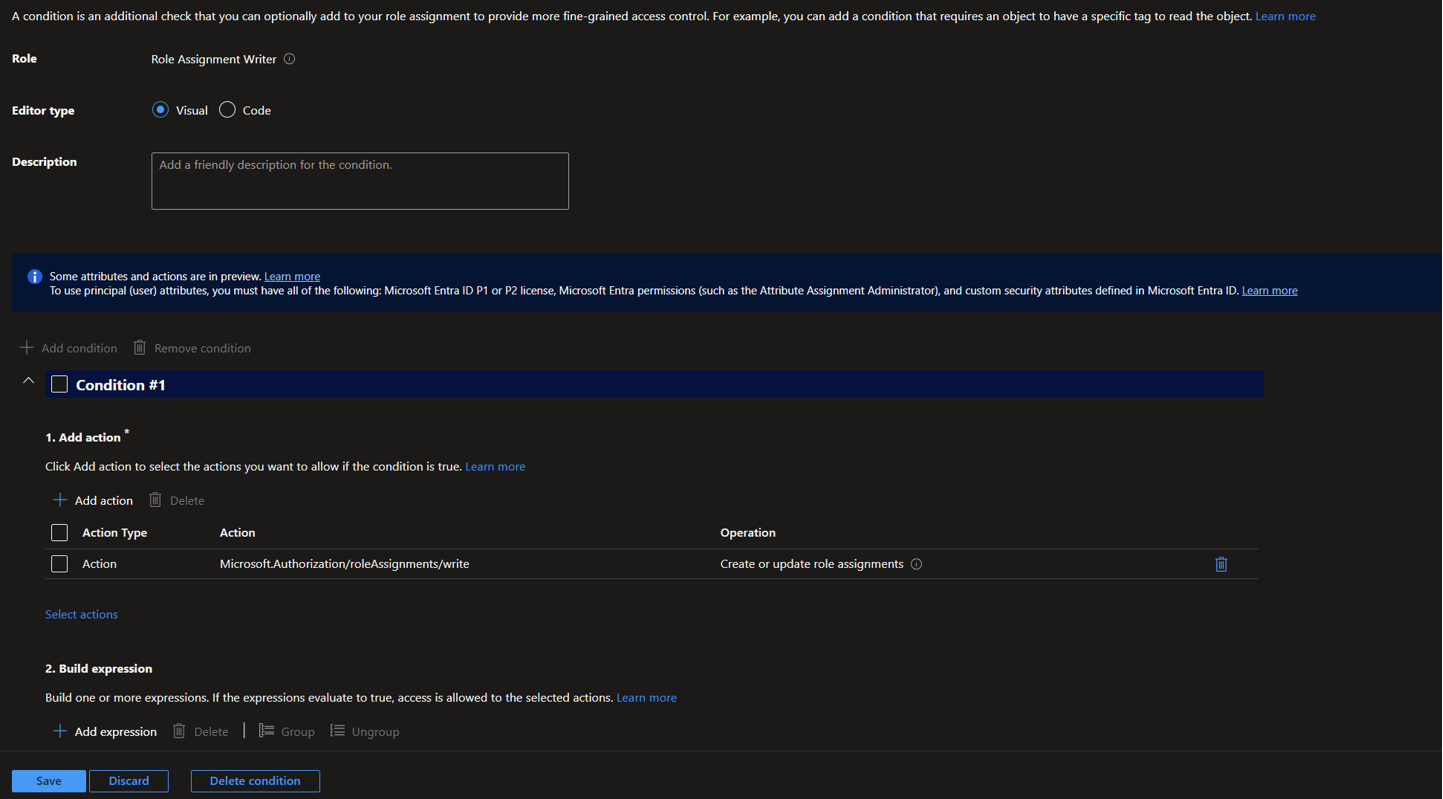
- This logical flow wizard essentially allows you to create a list of roles that our DevOps service principal is allowed to apply, or to what resources it can give roles to. It can be worked through visually or via code:

So, you might say “Sure it can grant roles, but only these specific low-risk ones” or “Sure it can grant roles, but only to these specific apps or entities” or a mixture of both!
For example, based on the modules from the first part, we might say it can only grant Service Bus Data Sender and Service Bus Data Receiver. In code view this would look like this:
(
 (
  !(ActionMatches{'Microsoft.Authorization/roleAssignments/write'})
 )
 OR
 (
  (
   @Request[Microsoft.Authorization/roleAssignments:RoleDefinitionId] GuidEquals 4f6d3b9b-027b-4f4c-9142-0e5a2a2247e0
   OR
   @Request[Microsoft.Authorization/roleAssignments:RoleDefinitionId] GuidEquals 69a216fc-b8fb-44d8-bc22-1f3c2cd27a39
  )
 )
)
NOTE: The GUIDs you can see above are always the same in any Azure tenant. These are the values we map to from the human readable values in the Bicep samples from the first section.
If someone accidentally (or intentionally) attempted to grant some other elevated or privileged role using the DevOps service principal, it would be denied.
Conclusion
By automating role assignments with Bicep, and using custom roles and conditions, you can manage permissions in a more secure, repeatable manner. This approach follows the principle of least privilege, giving your service principal just enough permissions to do its job, but no more. These techniques will help you maintain tighter control over your Azure environment and prevent potential security risks.


